Go to Playbook Main Page
Go to previous page
User Guide: Managing Workspaces in DataCore#
This guide is intended for teams who want to use DataCore's managed Databricks offerings (specification) without having to manage their own infrastructure. It outlines how to request access, get your environment provisioned, and manage it securely and effectively.
Is This Guide for You?#
You should use this guide if: - You have a business need to use DataCore. - You do not want to manage infrastructure yourself. - You do not require custom workspace configuration of Databricks (e.g.,networking).
You should not use this guide if: - You're an individual contributor needing access (project/team setup must be in place first). - You require custom configurations to your Databricks workspace.
Guide Overview#
This guide is split into two parts:
- Requesting Access: What you need to provide and how to do it.
- Using the Workspace: How to access and manage your provisioned resources.
Part 1: Requesting Access#
Access to DataCore is managed via Microsoft Entra ID groups within Azure. The overall access model and patterns used in DataCore are described here.
Essentially:
- You (or us) create an Entra ID group compatible with NovoAccess.
- We grant that group access to the Databricks Workspace.
- Your system manages that group through NovoAccess.
The process consists of the following steps:
- Meet the pre-requisites.
- Identify your needs.
- Create and submit a request.
- Wait for the request to be released.
- Request access for your team via NovoAccess.
- Start using the workspace and resources.
Step 1 - Meet the Prerequisites#
DataCore includes patient data and is GxP-compliant. For this reason, there is one key requirement you must meet before using it:
Before you can request access, your system must be registered as a Business Application in ServiceNow (SNOW) so it can be identified within Novo Nordisk's IT landscape, including associated roles such as IT System Owner and IT System Manager.
To register your application:
- Apply for the role:
ServiceNow ITOM: ITOM Editorvia NovoAccess. - To create a new Business Application, follow the steps described here. In brief, log in to ServiceNow (SNOW) and follow this video tutorial to complete the process. Below is an example of how to create a sandbox node for testing DataCore in a non-production environment.
Use these values for a Sandbox setup to test DataCore in a non-production scenario:
Type: IT Infrastructure System
Install type: Public Cloud
Life cycle status: Development
Environment: Sandbox
Note: No automatic notification is sent when the application is created, so you’ll need to check its status manually. The application is considered successfully created once the ID field is populated with a five-digit value.
- To add usage information, see the Add Usage Information video tutorial.
- Follow the Adding and removing Roles video tutorila to assign roles:
-
IT Solution Owner- typically your manager or cost owner. -IT Solution Manager- you or another relevant technical contact. - Optionally, you can add team members asOther Editorto enable collaborative editing of the application moving forward.
Once everything is in place, your system will be assigned an ID in SNOW and have an associated owner (role) assigned. This system owner is used to establish ownership of all resources in DataCore.
Optional but recommended:
Upload a document in Quality Docs that delegates responsibilities from your system owner or system manager toa designated individual. See F-00728428 for an example.
2. Step 2 - Identify Your Needs#
Identify what you need to do:
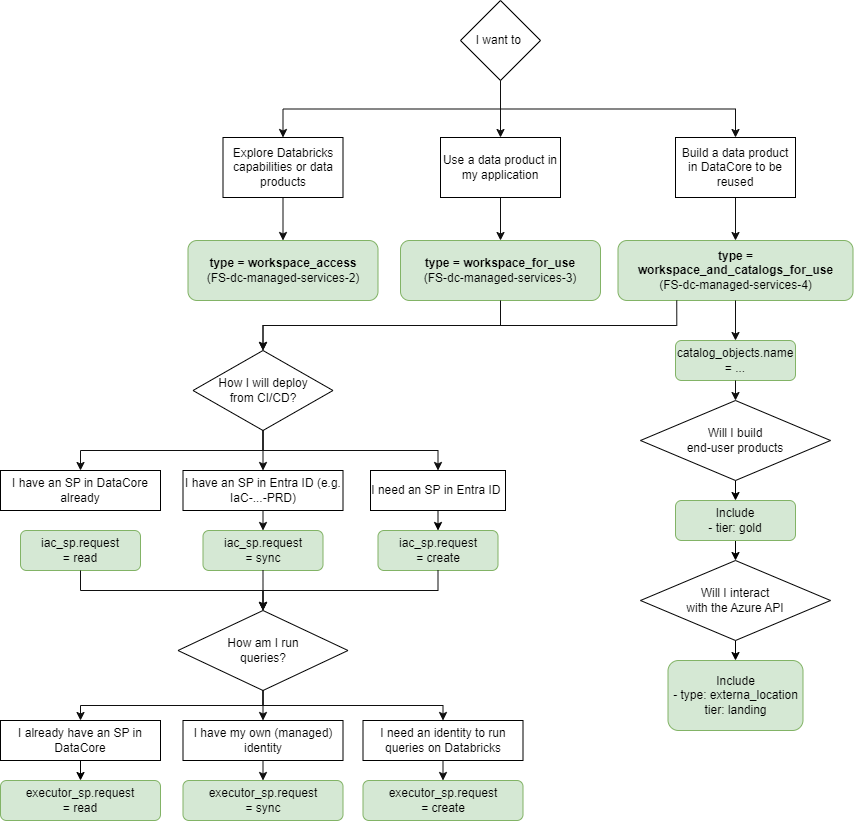
The specifics of the request are important! This will determine how you structure your YAML request.
Once you've identified the need, prepare a YAML file with you request, following the format shown in this example.
3. Step 3 - Create a Request#
At DataCore, we use YAML files and Azure DevOps (ADO) to submit and approve requests. The process works as follows:
Note: The process depends on whether the
dc-managed-servicesrepository is hosted on GitHub or ADO.
If the repo is in GitHub:#
- Fork
dc-managed-serviceson GitHub.
Note: You need the Git
CreateRepositorypermission to perform this action.
- Clone your fork locally:
git clone https://github.com/<your-username>/dc-managed-services.git cd dc-managed-services. -
Create a new file under
service_requests/<app_name>.yamlwhereapp_nameis your business application name in SNOW. -
Create and switch to a new branch:
git checkout -b add-request-for-<app_name> -
Commit your file in a new branch.
git add service_requests/<app_name>.yaml git commit -m "Add service request for <app_name>" - Push your branch to GitHub:
git push origin add-request-for-<app_name> - Create a new Git repository in Azure DevOps and push your branch there.
git remote add ado https://dev.azure.com/<org>/<project>/_git/dc-managed-services
git push ado add-request-for-<app_name>
dc-managed-services using your pushed branch.
- Assign your system owner as reviewer.
- Include a descriptive title and explanation of the request in the PR.
If the repo is in Azure DevOps:#
- Open the dc-managed-services repo in ADO.
- Click the ⋮ (three-dot menu) > Fork this repository to your own ADO project so you can modify it.
- Create a new file under
service_requests/<app_name>.yamlwhereapp_nameis your business application name in SNOW. - Complete the file using test.yaml and other requests in the directory as references.
- Create a new branch containing your changes and commit the file.
- Create a pull request from your fork back to the main branch of
dc-managed-services, assigning your system owner to it as required.
Step 4 - Wait for a Workspace Release#
These requests are currently handled as standard IT changes under our Operations & Maintenance (O&M) procedures. This means that we will:
- Review and approve the request.
- Perform a risk and impact assessment for the release.
- Release it for GxP use following our O&M governance and controls.
You will be notified once the process is complete. On average, this takes approximately three business days.
Step 5 - Request Team Access via NovoAccess#
At this stage, a new group will be created in NovoAccess (na/ in your browser) with the display name Cloud Group : group.name, where group.name is taken from your request YAML file.
Note that this is a reader group - anyone who only needs access to your data (without write or management permissions) should request membership in this group.
Users who require more privileges than simply reading the data should request
access to Cloud Group : DC-NN-catalog_objects.name-environments_Contributor,
where the values for catalog_objects.name and environments are taken from
their request YAML file.
Part 2: Using and Managing Your Workspace#
With the setup complete, you now have a fully functional Databricks workspace and, if requested, a set of catalogs. The following sections provide guidance on how to access and manage your workspace.
You can access the workspace depending on your EVP area and region of your request:
- dev, westeurope
- dev, eastus2
- dev, northeurope
- commercial, westeurope
- red, westeurope
- staffs, westeurope
Access via CLI#
# install Azure CLI

curl -sL https://aka.ms/InstallAzureCLIDeb | sudo bash

# authenticate on your browser with your regular user (or as a service principal with a token)
az login

# install Databricks CLI

curl -fsSL https://raw.githubusercontent.com/databricks/setup-cli/main/install.sh | sh

# export Databricks host

export DATABRICKS_HOST="https://adb-1820730458762836.16.azuredatabricks.net"  # depends on your EVP and region

# show all catalogs in Novo Nordisk
databricks catalogs list

# show all schemas in DataCore's catalog
databricks schemas list datacore_bronze_prd

# show tables in one of the schemas
databricks tables list datacore_bronze_prd epid
The catalog(s) you requested should be available in Catalog browser named
<catalog_objects.name>_<catalog_objects.requests.tier>_<environment>, where
catalog_objects.name, catalog_objects.requests.tier, and environment are
taken from your request YAML file.
At this stage, you can run compute and interact with the workspace.
However, access to data requires a separate request. Since the data is clinical in nature, access must be explicitly approved by the designated data owners for your team.
See the Access Data in DataCore guide to request access to data.
At the same time, you can prepare your ADO to use Databricks through Entra ID Setup ADO Service Connection for Databricks.
Identity & Access management (IAM)#
Role-based Access (RBAC)#
DataCore uses a role-based access control (RBAC) model to manage access to its workspace and related resources. This model is fully integrated with Novo Nordisk’s Entra ID and NovoAccess.
Groups (Roles)#
DataCore creates specific (Entra ID) groups when it provisions the workspace and catalogs for you. You can find description of the different groups that we have created for you in the Functional Specification which will vary depending on what service offering you have.
Users who receive a role assignment, by requesting access to a group in NovoAccess, are granted access to the workspace.
Users#
User Identity is managed through Entra ID - no action is required on your part.
User Role Assignment#
User role management is done through Novo Access - role assignments are automatically synchronized to Databricks. Your business application is expected to manage these groups in Novo Access such as approval, removal, and overall responsibility for assigning users to specific groups.
Service Principals#
DataCore creates specific (Entra ID) service principals when it provisions the workspace and catalogs for you. The created service principals and their intended purposes are described in the Functional Specification, according to your selected service offering.
We recommend:
- Integrating the IaC service principal into your Git management system (e.g., Azure DevOps) to enable deployments via CI/CD pipelines using this identity.
Instructions for integrating the IaC service principal with Azure DevOps can be found in DataCore's documentation.
- Using your executor service principal to run workloads. This service principal should not have a client secret, as Databricks service principals operate as Azure Managed Identities and do not require a shared secret to establish their machine identity.
Managing Your Resources#
Manage Secrets#
Each workspace includes a secret store that can be managed using the Databricks CLI.
Databricks provides extensive Databricks secrets CLI documentation on managing secrets, which we recommend reviewing for best practices and implementation guidance.
You can also use Terraform:
from Databricks provider.
Manage Databricks Asset Bundles#
Databricks Asset Bundles are managed in Databricks via command line interface (CLI). Both users and service principals can create and manage these bundles within the workspace.
We recommend the following general configuration for your Databricks asset bundles:
- Do not use shared workspace - place your bundles in the user's directory -specifically under the IaC user’s directory - and assign the necessary permissions for the executor to access them. Rationale: The shared workspace is accessible to all users of DataCore-managed services. Storing bundles there exposes them to modification or access by others.
- Set explicit permissions on who can view and manage the bundles so your team can view and monitor deployments. Rationale: By default, only the owner can view and interact with a bundle. When deployed via CI/CD, only the service principal (SP) has access. However, your operational team should also have visibility - e.g., to view logs or check deployment status.
- Use webhooks to receive notifications on task failures to notify your team when tasks fail. Rationale: This ensures your team is alerted promptly when deployments or jobs fail, improving operational responsiveness.
For more details, see Datacore documentation.
Manage Catalogs#
When your request includes catalogs, DataCore provisions additional groups to manage them (NN-DC-<team>_Contributor. See the Functional Specification for details.
We grant this group MANAGE permissions on the catalog. However, while you may technically have the ability to do so, you are not authorized to:
- Rename the catalog.
- Remove the catalog.
These actions must be performed through DataCore by submitting a YAML request that includes the catalog definition.
We recommend managing permissions using API, CLI, or Terraform via
from Databricks provider.
Manage Environments#
To maintain security and reduce risk, environment separation is enforced at the workspace level through the use of environment-specific service principals (SPs), role assignments via groups, and consistent naming conventions for workflows (jobs). These measures ensure that your environments remain properly isolated and controlled:
-
Service Principal Permissions: Each IaC-teamA-ENV service principal has permissions to manage and use only the corresponding databricks-executor-teamA-ENV. For example, IaC-teamA-DEV can only manage and use databricks-executor-teamA-DEV, not databricks-executor-teamA-PRD.
-
Job Deployment and Execution: Jobs created by IaC-teamA-ENV can only run using the corresponding databricks-executor-teamA-ENV. This is enforced by Databricks permissions.
-
Developer Permissions: Developers with DC-NN-teamA-ENV_Contributor role can only manage workflows (jobs) deployed by the corresponding IaC-teamA-ENV.
-
Data Access: By default, databricks-executor-teamA-DEV cannot write to other ENVs schemas in Unity Catalog.
The following example demonstrates how to configure your CI/CD pipeline workflow (job) to achieve the environment separation described above. This is done by dynamically setting the ENV variable:
- Job Name: teamA-ingest-SourceB-ENV
- Deployed with service principal: IaC-teamA-ENV
- Executed (run as) on Databricks with: databricks-executor-teamA-ENV
- Job Permissions:
- Owner: IaC-teamA-ENV (the service principal that created it)
- Can manage: DC-NN-teamA-ENV_Contributor (developers in your team)
Note: For output schemas, tables, files, and other front-facing products, we recommend omitting environment-specific suffixes like -PRD. This promotes clean, user-friendly naming - similar to how websites like facebook.com or amazon.com avoid including -prd in their domain names.