Setting Up AI Tools#
To use the Agentic Data Pipelines Framework and AI-assisted development tools, you need to configure your environment to connect to the Novo Nordisk AI Marketplace.
This page serves as a high-level guide. Please refer to the AI Marketplace for detailed setup instructions.
Centralized Tool Management
Do not use external API keys or standard Anthropic accounts. All local AI tools must route through the internal AI Marketplace using a generated developer token.
Setup Workflow#
Please follow these high-level steps to complete your setup.
Step 1: Generate Your Developer Token#
You need a developer token to get started.
- Visit the AI Marketplace.
- Click on Get Started (under Quick Start) and then on Request Access to navigate to the API Access Form.
-
Fill out the request:
- Select your existing Team Name or create a new one if you don't have one.
- Choose the developer account type (unless you need a non-interactive service account for CI/CD pipelines).
- Provide a brief purpose in the description (e.g., "Local Claude Code development").
-
Submit the form to generate your token.
Store Your Token Safely
The token appears only once so save it in a secure location. Treat this token like a sensitive password. Never commit it to version control (like GitHub).
Step 2: Install Claude Code#
To install Claude Code, please follow the specific instructions for your operating system below.
To install Claude Code CLI in macOS, use one of the following methods using the terminal:
brew install --cask claude-code
If you don't have Homebrew installed on your Mac, go to Homebrew website and follow the instructions to install it first, then run the above command.
curl -fsSL https://claude-code.com/install.sh | sh
Windows users must set up their WSL environment and resolve Zscaler certificate issues before installing Claude Code.
For detailed instructions on setting up WSL and resolving Zscaler issues, please refer to the AI Marketplace - Windows Developer Setup (WSL2).
TL;DR Prerequisites:
-
Request a Developer Profile: Request the Elevated Access on Windows 11 - Windows 11 for Developers profile.
Hold "Alt" / "Option" to enable Pan & Zoom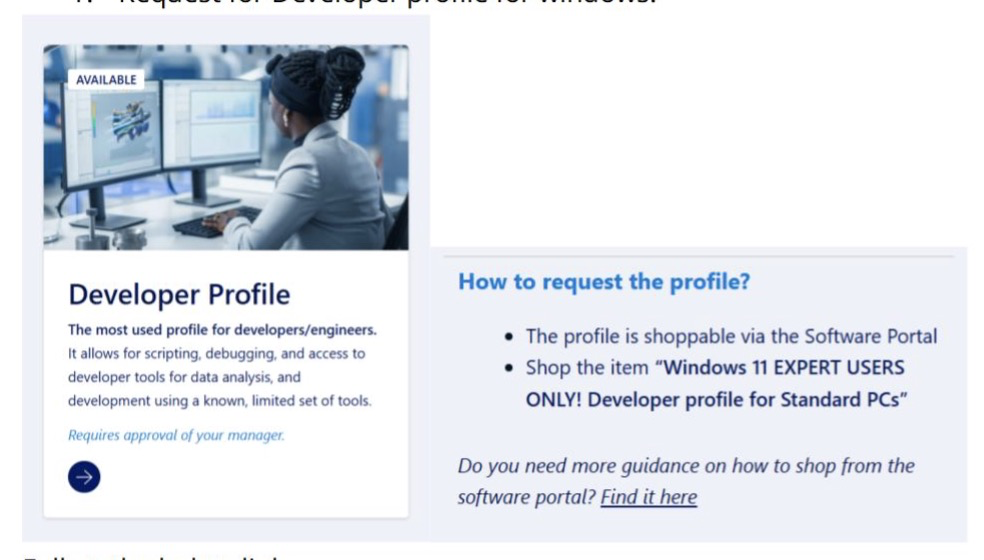
-
Required NovoAccess: Apply for the following Zscaler developer profiles from NovoAccess.
AD Group: Zscaler_Developer_profile(independent of OS)AD Group: Zscaler_Developer_profile_Windows(specific Windows profile)
-
Install WSL (Ubuntu): If you do not have WSL installed, you can install it using PowerShell:
- Open PowerShell as Administrator.
- Run the command:
wsl --install -
Restart your machine if prompted.
Hold "Alt" / "Option" to enable Pan & Zoom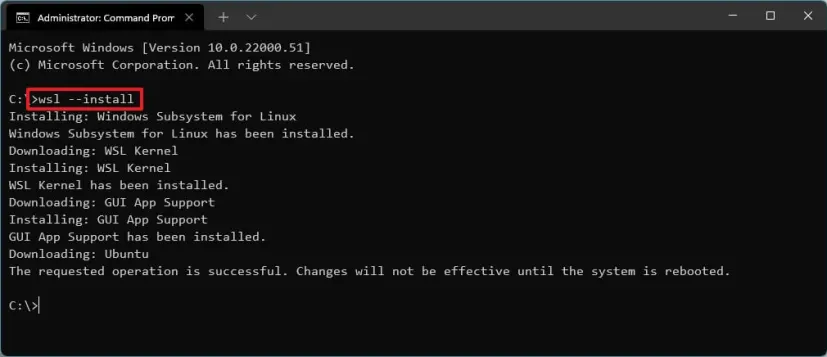
-
Initialize VS Code: To use Claude Code/OpenCode for your development, you can set up Visual Studio Code with WSL integration.:
- Open Visual Studio Code.
- Install the official WSL extension by Microsoft from the Extensions view (
Ctrl+Shift+X). - Open the command palette (
Ctrl+Shift+P) and typeWSL: Connect to WSL.
-
Install Claude Code CLI: Once your WSL environment is setup, run the following command inside your WSL terminal to install the CLI:
curl -fsSL https://claude-code.com/install.sh | shTip
If you encounter minor errors during setup, use the Agent chat in VS Code to help resolve them.
Troubleshooting SSL Certificates:
If you face SSL certificate issues in VS Code or Python due to Zscaler:
- Ensure you have the correct Zscaler certificates installed in your WSL environment, refer to Add Certificates to CA Certificates Step in this guide
- Refer to the KCS Knowledge Base article: How to resolve SSL certificate issues in VS Code / Visual studio and Python due to Zscaler.
Step 3: Configure Claude Code#
Once you have installed the CLI, Follow the AI Marketplace Claude Code Setup Guide to create and configure your settings.json file using the JSON template provided there.
Installation Warning
DO NOT run the claude command until you have fully applied the settings.json configuration. Running it too early will prompt you to create an external Anthropic account, which is incorrect for internal use.
Tip
- The
settings.jsonfile is typically located in your home directory under.claude(e.g.,~/.claude/settings.jsonon macOS/Linux orC:\Users\YourUsername\.claude\settings.jsonon Windows). To edit it from a terminal, type:
On mac:
open -e ~/.claude/settings.json

On Windows WSL:
edit C:\Users\YourUsername.claude\settings.json
* Remember to replace the placeholder token in the template with the actual developer token you generated in Step 1.
* You can set a default model in `settings.json` using `"ANTHROPIC_MODEL": "anthropic_claude_sonnet_4_6"` or specify it in the session using `/model <model_name>` command. Find available models in the [AI Marketplace](https://marketplace.novo-genai.com/model/model-cards/).
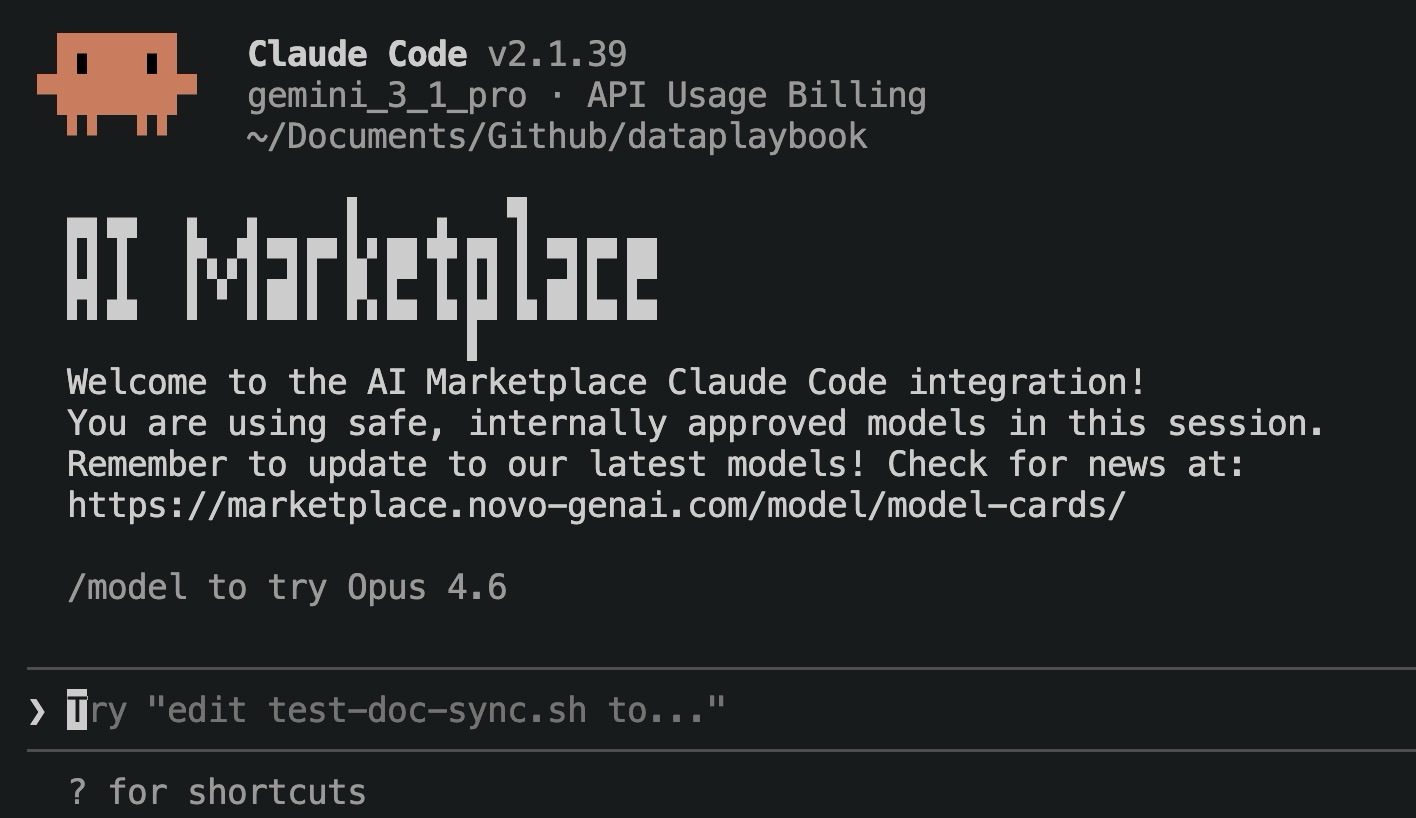
Step 4: Verify Your Claude Code Installation#
Run claude in your terminal. You should see a welcome message confirming that you are connected to the AI Marketplace.
If you encounter any issues, refer to the detailed documentation in the AI Marketplace documentation or contact either Data Engineering Enablement team or AI Marketplace Team for assistance.