Deploy Phase#
Overview#
The Deploy phase implements automated deployment pipelines using the framework to ensure reliable, compliant, and traceable deployments to production environments. This phase establishes CI/CD workflows that automatically promote code through multiple environments with appropriate testing and approval gates.
What You Will Learn#
After completing this chapter, you will understand how to:
- Configure and customize the dc-release framework for deploying your data products
- Set up automated CI/CD pipelines using GitHub Actions workflows
- Configure deployment secrets and federated authentication
- Monitor deployments and troubleshoot common issues
- Follow GxP-compliant release processes with proper documentation
- Set up automated testing and quality gates at each deployment stage
Key Personas & Stakeholders - RACI Matrix#
| Activity | Data Product Owner | Data Engineer | IT PM/SM/IM | Solution Architect | Release Manager |
|---|---|---|---|---|---|
| CI/CD Configuration | A | R | C | C | I |
| Environment Setup | C | R | C | C | I |
| Deployment Validation | A | C | C | C | R |
| Release Approval | A | C | R | C | R |
| Production Deployment | C | R | A | C | R |
| Documentation Review | R | C | A | C | R |
R = Responsible, A = Accountable, C = Consulted, I = Informed
Prerequisites#
Before proceeding with deployment setup, ensure you have the following:
Technical Prerequisites#
- Repositories: You need to have at least 3 repositories created
- your code repository, setup using Templates as described here.
-requirementsrepository needed fordc-releaseframework to store your business solution requirements and-release-logrepository to store your solution's release notes as needed bydc-releaseframework
- Completed Build Phase: Data product successfully built and verified as described here
- Azure Resources: Databricks workspace and Unity catalog provisioned for all environments (dev, tst, val, prd)
Access and Permissions#
- GitHub Organization: Admin access to configure secrets and variables in your repositories
- Azure Subscriptions: Contributor access to target environments
- Service Principals: Federated credentials configured for GitHub Actions
Documentation Requirements#
- Functional Specification: Complete with intended use and public API definition
- Risk Assessment: Solution-specific risk analysis completed
- Test Strategy: Comprehensive testing approach documented
- Operations Manual: Deployment and maintenance procedures defined
- Recovery Procedure: Rollback and recovery strategies defined
Understanding the dc-release Framework#
The dc-release framework provides a standardized approach for deploying GxP solutions with:
- Automated Environment Promotion: Code flows through DEV → TST → VAL → PRD
- Quality Gates: Automated testing and manual approvals at each stage
- Documentation Generation: Automatic release notes and compliance documentation
- Audit Trail: Complete deployment history with approvals and test results
- Rollback Capability: Safe rollback procedures for production issues
dc-release Process Flow#
The following diagram illustrates the complete dc-release process from development to production deployment:
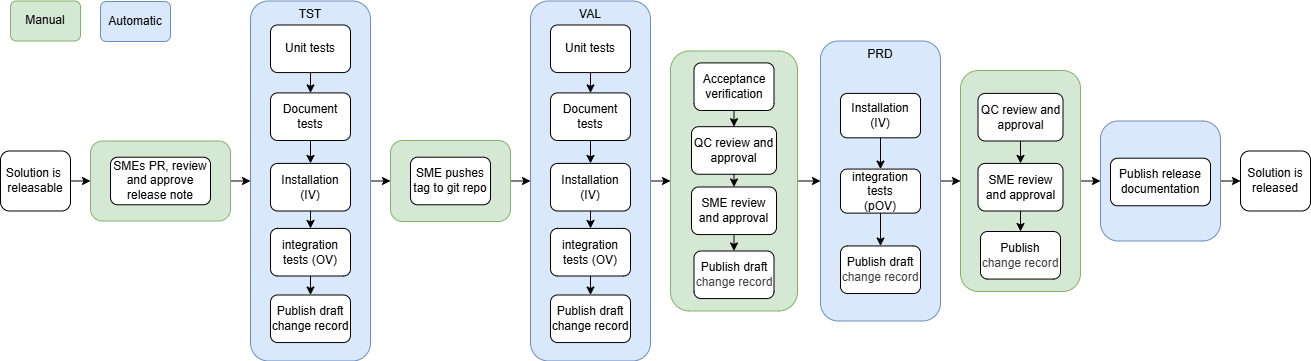
Process Breakdown#
| Phase | Environment | Key Activities |
|---|---|---|
| DEV | Development | Code development, Unit tests |
| TST | Test | Unit tests, Document tests, Installation verification (IV), Integration tests (OV) |
| VAL | Validation | Same as TST + Acceptance verification, QC review, SME approval |
| PRD | Production | Installation verification, Integration tests (pOV), Final approvals |
Key Approval Gates#
- SME (Subject Matter Expert): Reviews and approves at multiple stages
- QC (Quality Control): Reviews and approves before and after production deployment
- Acceptance Verification: Manual validation in VAL environment
- Change Records: Draft and final change documentation published at each stage
- Release with Tag: To trigger prod deployment
Step-by-Step Deployment Process#
Step 1: Configure GitHub Apps, Secrets and Variables#
Once you have completed the prerequisites and set up your code repository, you need to setup the required authentication and configuration for your deployment pipeline.
We recommend using GitOps (Configuration as Code) to manage secrets and variables, ensuring that changes are peer-reviewed and version-controlled.
Refer to Step 6 in Set Up Repository Using Templates page for detailed instructions on configuring the GitHub Apps, Secrets and Variables needed for deploying and running your pipelines.
Step 2: Configure Azure Federated Authentication#
Enable GitHub Actions to deploy to Azure without storing long-lived credentials.
Set Up Service Principal Access#
-
Navigate to Azure Portal: - Go to Azure Portal → App Registrations - Select your Databricks service principal
-
Add Federated Credentials: - Navigate to Certificates & secrets → Federated Credentials - Click Add Credential
-
Configure Credential:
Federated credential scenario: Other issuer
Issuer: https://token.actions.githubusercontent.com
Subject identifier: repo:YourOrg/YourRepo:ref:refs/heads/*
Name: github-actions-main
Audience: api://AzureADTokenExchange
- Add Additional Credentials for Tags:
Subject identifier: repo:YourOrg/YourRepo:ref:refs/tags/*
Name: github-actions-tags
Multiple Environment Credentials
Set up separate federated credentials for each environment if using different service principals for dev, tst, val, and prd.
Expected Outcome: GitHub Actions can authenticate to Azure for all target environments.
Step 3: Customize Deployment Workflows#
The dc-template-core provides placeholder GitHub Actions workflows. Customize them for your specific deployment needs.
Understanding the Main Workflow#
The main workflow (/.github/workflows/main.yaml) orchestrates the entire deployment process:
main.yaml
name: Main
on:
  push:
    branches: [main]
    tags: ["*"]
  pull_request:
    branches: ["**"]

jobs:
  code_quality:
    name: TEST-your-project-1
    uses: ./.github/workflows/check_code_quality.yaml

  dev:
    uses: ./.github/workflows/deploy_and_test.yaml
    with:
      environment: dev
    secrets: inherit

  test_docs:
    uses: NovoNordisk-DataCore/dc-release/.github/workflows/publish.yaml@main
    with:
      environment: dev
    secrets: inherit

  tst:
    needs: [code_quality, dev, test_docs]
    if: ${{ github.ref == 'refs/heads/main' || startswith(github.ref, 'refs/tags/') }}
    uses: ./.github/workflows/deploy_and_test.yaml
    with:
      environment: tst
    secrets: inherit

  pre_val:
    needs: [tst]
    if: ${{ startswith(github.ref, 'refs/tags/') }}
    uses: NovoNordisk-DataCore/dc-release/.github/workflows/publish.yaml@main
    with:
      environment: tst
    secrets: inherit

  val:
    needs: [pre_val]
    uses: ./.github/workflows/deploy_and_test.yaml
    with:
      environment: val
    secrets: inherit

  pre_prd:
    needs: [val]
    uses: NovoNordisk-DataCore/dc-release/.github/workflows/approve_to_prd.yaml@main
    secrets: inherit

  prd:
    needs: [pre_prd]
    uses: ./.github/workflows/deploy_and_test.yaml
    with:
      environment: prd
    secrets: inherit

  for_use:
    needs: [prd]
    uses: NovoNordisk-DataCore/dc-release/.github/workflows/approve_for_use.yaml@main
    secrets: inherit
[Optional] Customize Main workflow for non-GxP needs#
The documentation, val and pre-val checks can be removed for a non-GxP solution. Below is an example:
Example non-GxP Main Workflow
name: Main
on:
  push:
    branches:
      - main
    tags:
      - "*"

  pull_request:
    branches:
      - "**"

jobs:
  code_quality:
    name: TEST-${{ github.event.repository.name }}-1
    uses: ./.github/workflows/check_code_quality.yaml

  dev:
    uses: ./.github/workflows/deploy_and_test.yaml
    with:
      environment: dev
    secrets: inherit

  tst:
    needs: [code_quality, dev] #removed test_docs
    if: ${{ github.ref == 'refs/heads/main' || startswith(github.ref, 'refs/tags/') }}
    uses: ./.github/workflows/deploy_and_test.yaml
    with:
      environment: tst
    secrets: inherit

  pre_prd:
    needs: [tst]
    uses: NovoNordisk-DataCore/dc-release/.github/workflows/approve_to_prd.yaml@main
    secrets: inherit

  prd:
    needs: [pre_prd]
    uses: ./.github/workflows/deploy_and_test.yaml
    with:
      environment: prd
    secrets: inherit
Customize deploy_and_test.yaml#
Modify /.github/workflows/deploy_and_test.yaml to implement your specific deployment logic:
deploy_and_test.yaml
on:
  workflow_call:
    inputs:
      environment:
        description: Target environment
        required: true
        type: string

jobs:
  deploy:
    name: Deploy to ${{ inputs.environment }}
    runs-on: ubuntu-latest
    environment: ${{ inputs.environment }}
    steps:
      - name: Checkout code
        uses: actions/checkout@v4

      - name: Set up Python
        uses: actions/setup-python@v4
        with:
          python-version: '3.11'

      - name: Install dependencies
        run: |
          pip install databricks-cli
          pip install poetry

      - name: Build Python wheel
        run: |
          poetry install
          poetry build

      - name: Deploy to Databricks
        env:
          DATABRICKS_HOST: ${{ vars.DATABRICKS_HOST }}
          DATABRICKS_TOKEN: ${{ secrets.DATABRICKS_TOKEN }}
        run: |
          databricks bundle validate --target ${{ inputs.environment }}
          databricks bundle deploy --target ${{ inputs.environment }}

      - name: Run integration tests
        if: inputs.environment != 'prd'
        run: |
          # Run your integration tests here
          python -m pytest tests/integration/ --env=${{ inputs.environment }}

      - name: Run verification tests
        if: inputs.environment == 'prd'
        run: |
          # Run only non-destructive verification tests in production
          python -m pytest tests/verification/ --env=prd
Expected Outcome: Customized deployment workflows that handle your specific pipeline requirements.
Step 4: Set Up Environment-Specific Configuration#
Configure Databricks Asset Bundle for different environments using the bundle configuration generated by the templates.
Databricks Bundle Configuration#
The dc-template-core generates a databricks.yml file. Customize it for your environments:
databricks.yml
bundle:
  name: corp-procurement

# The following variables are passed to the job during deployment
variables:
  environment:
    description: the environment to use
  run_as:
    description: user to run as
  webhook_on_failure:
    description: The webhook used to notify on failure
  manage_group_name:
    description: Name of the group that can manage the job

artifacts:
  default:
    type: whl
    build: hatch run databricks:build "${workspace.file_path}"
    path: .

sync:
  include:
    - dist/*.whl
    - requirements-databricks-wheels.txt

resources:
  jobs:
    main:
      # This ensures other developers can see
      # manage and debug the job in the UI
      permissions:
        - group_name: ${var.manage_group_name}
          level: CAN_MANAGE
      name: ${bundle.name}/${var.environment}/main

      # schedule the job
      schedule:
       quartz_cron_expression: "0 0 0/3 * * ?"
       timezone_id: Europe/Amsterdam

      # set tags as you see fit
      tags:
        specification: FS-${bundle.name}-1
        git-origin: ${bundle.git.origin_url}
        git-commit: ${bundle.git.commit}
      environments:
        - environment_key: default
          spec:
            client: "2"
            dependencies:
              - --requirement ${workspace.file_path}/locks/databricks/requirements.txt
              - --requirement ${workspace.file_path}/requirements-databricks-wheels.txt

      # Define the tasks that are part of this job
      # e.g. the two tasks - source_to_landing
      # and landing_to_bronze
      tasks:
        - task_key: source_to_landing
          python_wheel_task:
            entry_point: source_to_landing
            package_name: etl
            parameters:
              - ${var.environment}
          environment_key: default
          # configure webhook notifications
          webhook_notifications:
            on_failure:
              - id: ${var.webhook_on_failure}

        - task_key: landing_to_bronze
          run_if: ALL_DONE
          # This task depends on the previous task
          # running succesfully
          depends_on:
            - task_key: source_to_landing
          python_wheel_task:
            entry_point: landing_to_bronze
            package_name: etl
            parameters:
              - ${var.environment}
          environment_key: default
          webhook_notifications:
           on_failure:
             - id: ${var.webhook_on_failure}

workspace:
  # This is the rootpath for both the development and production target
  root_path: /Users/${workspace.current_user.userName}/.bundle/${bundle.name}/${bundle.target}

targets:
  # This target is used for development
  development:
    mode: development

  # This target is used when deploying to production
  # and ensures that its run as the service principal
  main:
    default: true
    mode: production
    run_as:
      service_principal_name: ${var.run_as}
Expected Outcome: Databricks Asset Bundles that can deploy jobs or any other resources to Databricks configured and ready for deployment.
Step 5: Implement Release Process#
Follow the dc-release framework process for creating production releases.
Create Release Notes#
Before tagging a release, create release notes in documentation/releases/X.Y.Z.md. Read the documentation/releases/README.md and use documentation/releases/TEMPLATE_RELEASE_NOTE.md.Below is an example :
# Release note

This release contains the following changes:

* [#123 - Add customer lifecycle segmentation](https://github.com/org/repo/pull/123)
* [#124 - Improve data quality validation](https://github.com/org/repo/pull/124)
* [#125 - Update documentation for new API endpoints](https://github.com/org/repo/pull/125)

## Impact assessment

This is a minor release adding new segmentation capabilities. No breaking changes to existing APIs. New endpoints are additive and backward compatible.

## Risk assessment

- **Low Risk**: New functionality is isolated and well-tested
- **Data Quality**: Enhanced validation reduces risk of data issues
- **Performance**: No impact on existing pipeline performance
- **Dependencies**: No changes to external dependencies
Tag and Deploy Release#
- Create and merge release notes PR:
git checkout -b release/1.2.0
# Create release notes file
git add documentation/releases/1.2.0.md
git commit -m "Add release notes for v1.2.0"
git push origin release/1.2.0
# Create PR and get it approved/merged
- Create release tag:
git checkout main
git pull origin main
git tag v1.2.0
git push origin v1.2.0
- Monitor deployment pipeline:
- Watch GitHub Actions for automated progression through environments
- Verify deployments succeed in each environment
- Review test results and quality gates
Success
Release automatically progresses through environments with proper approval gates and release notes will get deployed with a folder name equalling the version number deployed and same will reflect in the chosen *-release-log repo created as pre-requisites.
Success Metrics & Checkpoints#
- GitHub Configuration: All secrets and variables properly configured
- Azure Authentication: Federated credentials working for all environments
- Workflow Customization: Deployment workflows customized for your application
- Environment Configuration: Databricks bundles configured for all targets
- DEV Deployment: Successful automated deployment to development environment
- TST Promotion: Code successfully promotes to test environment on main branch
- Release Process: Can create tags that trigger VAL/PRD deployment pipeline
- Approval Gates: Manual approvals working for controlled environments
- Documentation: Release notes and compliance documentation generated
- Monitoring: Can track deployment status and troubleshoot issues
Common Challenges & Solutions#
Challenge: GitHub Actions Authentication Failures#
Symptoms:
- Error:
Error: Could not authenticate to Azure - Failed federated credential validation
Solution:
- Verify federated credential configuration in Azure Portal
- Check subject identifier format:
repo:org/repo:ref:refs/heads/* - Ensure service principal has correct permissions
- Validate GitHub secrets are correctly set
Prevention: Test authentication in a simple workflow before full deployment
Challenge: Databricks Bundle Validation Errors#
Symptoms:
databricks bundle validatefails- Resource configuration errors
Solution:
- Check
databricks.ymlsyntax and indentation - Verify workspace URLs and service principal names
- Test bundle validation locally:
databricks bundle validate --target dev - Review Databricks CLI authentication
Prevention: Validate bundle configuration in development environment first
Challenge: Environment-Specific Configuration Issues#
Symptoms:
- Wrong catalog or workspace used in deployment
- Jobs deployed with incorrect configuration
Solution:
- Review target-specific variables in
databricks.yml - Verify environment variables passed to workflows
- Check bundle target selection in deployment scripts
- Test deployment with verbose logging
Prevention: Use clear naming conventions for environment-specific resources
Next Steps#
After successful deployment setup:
- Operations and Maintenance - Learn about operations and maintenance procedures
- Monitor Production Jobs - Set up comprehensive monitoring and alerting
- Establish Support Procedures - Create runbooks and escalation procedures
Additional Resources#
Framework Documentation#
Template Resources#
- dc-template-core Repository
- dc-template-python-project
- dc-template-data-product
- Working with Templates Locally